California Martingale #CM5
$48.00
Description: This California Martingale is made entirely of 1/4 inch solid braid nylon cord. The rein rings and cinch snap are stainless steel. The rein rings are tied with bowline knots directly into the neck strap. This makes it easy to change their position higher and lower on the neck strap for different horses or different levels of training. The neck strap and the cord running to the cinch are also adjustable. Simply let out or take up cord and re-tie the overhand knot.
This martingale is made with a 1/2 inch latigo safety hobble strap. This strap slides under your saddle’s gullet and up over the horn. It prevents the martingale from slipping up the neck if your horse lowers its head.
How it works: Unlike a running martingale, the rings on the California Martingale are tied on the neck strap and lay right on the neck. This gives you a real good, straight line from the bit to your hands. This line, or angle, will not only help your horse keep its head in position during more advanced training for collection, but it also helps your horse keep its shoulders up. This is a great aid to use on horses that want to drop their shoulders.
Related products
-
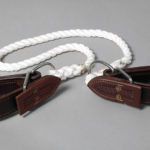
Bill Riddle Sideline #SL2
Price range: $97.00 through $106.00Description: The Bill Riddle Sideline #SL2 is made of two doubled and stitched burgundy latigo leather cuffs with easy on/easy off closures. These cuffs are 1 3/4 inch wide and connected by your choice of 24, 30 or 36 inch (see dropdown) pieces of soft white nylon rope. The rectangles and Dees are made of smooth round stainless steel rod.
How it works: This is a very helpful piece of equipment to use when you are sacking out a colt, teaching a young horse to stand hobbled or wanting to keep a horse from kicking in the trailer. You can prevent a horse that kicks in the trailer from hurting himself or damaging the trailer by using this sideline on just the left side or right side legs or use two sidelines and cross them between the legs. Sidelines and hobbles can both have a quieting effect on a horse’s mind.
The first time you use the sideline on your horse or while training the horse to accept them use a wide open sandy area. Do not put it on in the trailer or other confined space until they accept the sideline easily and well.
-
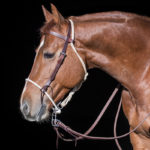
Easy Stop #ES1
$229.00Description: The Easy Stop #ES1 is a very good piece of tack to use when you want to teach your horse to stop correctly when cued, without having to put pressure on the mouth. Often a horse will show a lot of improvement in it’s stop with just a few rides in the Easy Stop.
The noseband is made of 3/8 inch nylon rope that is specially designed to lay right from the first ride. The headstall is made of 3/4 inch dense, tight-fibered harness leather. The leather has been edged, hand-rubbed, oiled with Neatsfoot Oil and hand-rubbed again. The buckles are stainless steel and the leather beneath the buckles is hand stitched together to prevent the buckles from sliding down as you’re adjusting the headstall. This Easy Stop includes a hand-tied tan 1/4 inch nylon fiador tied to the top of the spoon so it won’t interfere with the reins.
Choice of Reins: Almost any of the reins we make will work well. If you don’t see what you need here, please see the rein category These reins can be purchased separately.
How it works: The Easy Stop noseband will apply pressure on the nose just like a hackamore or bosal. Additionally, the stainless steel Easy Stop spoon will come forward as the reins are pulled and make contact with the horse’s chin, in the space between the 2 jawbones (the intermandibular space). I carefully designed the angle of the Easy Stop spoon to function correctly and lay close enough to the horse’s intermandibular space that it doesn’t apply pressure until the reins are pulled. The edges of the spoon are smooth and have a gentle bevel so there’s nothing sharp touching your horse. This Easy Stop is designed so the spoon doesn’t flip over when there’s not any pressure on the reins.
This is used by top professional cutting, cow horse, reining and barrel horse trainers, among others, and will last through years of use. This is a real good tool to have in your tack room for those times when a horse is not responding as soon as he is being asked to stop. Your horse should be broke to give at the poll and should be flexible both laterally and longitudinally before being ridden with an easy stop.
Shown on the horse with the Easy Stop are a pair of XX Harness Leather Split Reins #ASR3.
If you are unfamiliar with the use of an Easy Stop, seek professional help before using it on your horse.
-
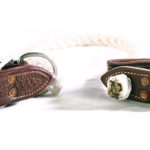
Bronc Sideline #SL1
$97.00Description: The cuffs on this Bronc Sideline #SL1 are made of 1 3/4 inch doubled and stitched burgundy latigo leather with a leather tab fastener for easy connection and release. The rectangle and Dee are made of smooth round stainless steel rod. The cuffs are connected with 1/2 inch by 24 inch nylon rope. This’ll be one of the handiest tools you’ll ever use.
How it works: To apply the Bronc Sideline just build a loop in the back of the cuff by sliding the rope through, let the colt step in it and pull it snug. Let him settle and then attach the easy-on front cuff. Always use caution when putting the sideline on for the first time. Get out in an open sandy arena with lots of room so your colts or horses will be safe if they react to having their legs connected with the sideline. Once horses learn how a sideline feels they usually accept it and stand quietly. Both sidelines and hobbles can have a very quieting effect on the horse’s mind.
The first time you use the sideline on your horse or while training the horse to accept it use a wide open sandy area. Do not put it on in a confined space until they accept the sideline easily and well. If you are not familiar with the use of sidelines seek help from a professional who is experienced with their use.
-
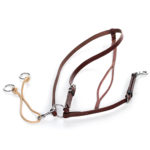
Sliding Running Martingale #CM3
$95.00Description: The Sliding Running Martingale #CM3 has a 3/4 inch adjustable neck strap made of heavy harness leather. Each end of the neck strap is stitched to a stainless steel ring. An adjustable tie down strap is sewn to the center of the neck strap ring on one end and snapped to the cinch on the other end. A second snap with a ring-end is snapped to the opposite side of the center ring of the neck strap. A heavy 1/4 inch nylon cord runs through the ring end of the snap. The nylon cord is 18 inches long and has rein rings at each end. An 1/2 inch latigo leather safety hobble strap with a slit on one end runs from the neck strap through the gullet of the saddle and over the horn. This safety hobble strap prevents the neck strap from sliding to the ears.
How it works: Running martingales are very useful tools to aid horses in learning proper head position as they learn collection. With this martingale, the sliding action of the nylon cord, occurring when the rider pulls on either rein, helps your horse maintain a correct frame as his head turns. If adjusted correctly a martingale does not force the head to stay in any given position but allows the horse a guide for head placement through automatic release of pressure on the reins when correct head placement is achieved. This can make it easier for a horse to reach a more collected frame over time by allowing assistance with head position as the rider teaches the horse to drive from behind.
-
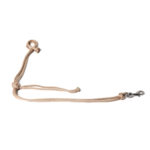
Nylon Tiedown Strap #ZH
$33.00Description: This is a high quality and at the same time economical tiedown strap made of 1/4 inch solid braid nylon cord. The cord loops through the ring in the tiedown and is adjustable. The swivel snap is stainless steel. This Nylon Tiedown Strap #ZH is very durable and let’s you stay on budget while getting a quality piece of gear!