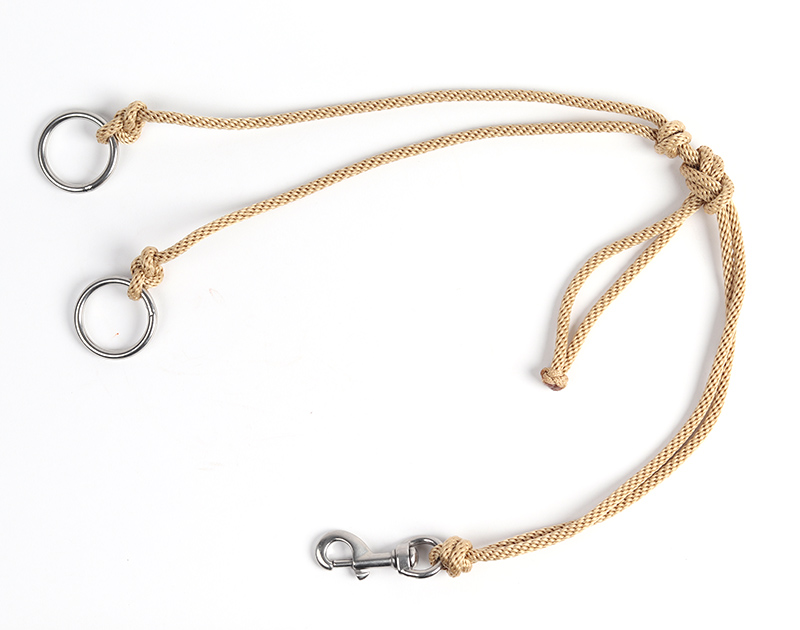
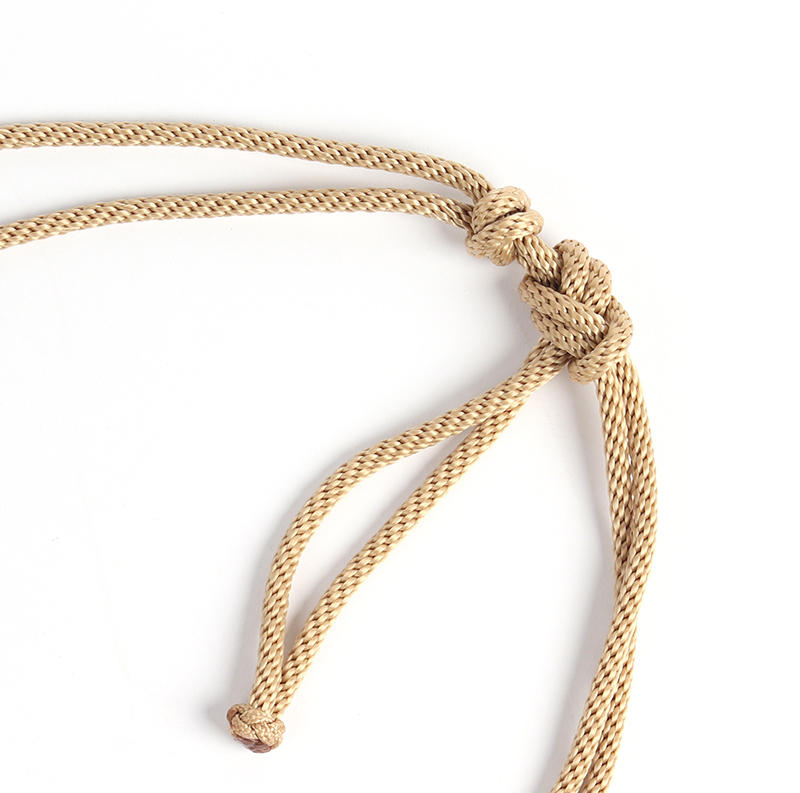

Training Fork #CM7
Price range: $36.00 through $46.00
Description: This adjustable training fork is made of tan 1/4 inch solid braid nylon rope with a 1 1/2 inch stainless steel ring tied to each end for a rein to run through. A stainless steel snap attaches it to the cinch.
How it works: A training fork helps horses learn to carry their heads in the proper position to allow them to drive from behind and improve collection. The training fork will apply pressure to the reins and bit anytime the horse’s head rises. You simply adjust the length of the cord that connects to the cinch to place the training fork rings in the correct position for each horse you’re riding. Learn more about training fork and running martingale adjustment here: Running Martingale Adjustment and Use-Keep it Safe.
Do not let the horse drop its head to the ground because it can step on the rein or training fork and cause an accident. Whenever a training fork is used, rein stops need to be used on the reins. Rein Stops will prevent the rings on the training fork from getting caught on the rein ends. Rein stops can be ordered in the dropdown.
Related products
-

Adjustable String Cavesson #CA2
$43.00Description: The noseband on this Adjustable String Cavesson #CA2 is made of tan 1/8 inch solid braid nylon cord. The adjustment knots at the bottom allow the noseband to be quickly changed between horses to 19, 21 or 23 inches. The headstall is made of 1/2 inch burgundy latigo leather that has been edged and hand-rubbed. The buckle is beveled stainless steel with a leather loop keeper. This cavesson lays flat under your bridle and will last for years of hard use.
Size Measurement: An easy way to be certain this cavesson will fit is to wrap a leadrope around the nose where the cavesson will lay, mark the leadrope with a magic marker, straighten it and then measure the leadrope. When measuring, be sure to wrap the leadrope loosely enough that the horse will have enough room between his nose and the cavesson to be comfortable and to be able to hold the bit. A good rule of thumb is 2 fingers width between the nose and cavesson (which is the diameter of most leadropes) if the horse is trained to a cavesson.
This cavesson is a good all-around cavesson and can be used on colts if adjusted loosely when starting them in it.
For more information on cavesson fit and use visit: There’s More to a Cavesson than Meets the Eye: How and Why to Use Cavessons
-
Bill Riddle Sideline #SL2
Price range: $97.00 through $106.00Description: The Bill Riddle Sideline #SL2 is made of two doubled and stitched burgundy latigo leather cuffs with easy on/easy off closures. These cuffs are 1 3/4 inch wide and connected by your choice of 24, 30 or 36 inch (see dropdown) pieces of soft white nylon rope. The rectangles and Dees are made of smooth round stainless steel rod.
How it works: This is a very helpful piece of equipment to use when you are sacking out a colt, teaching a young horse to stand hobbled or wanting to keep a horse from kicking in the trailer. You can prevent a horse that kicks in the trailer from hurting himself or damaging the trailer by using this sideline on just the left side or right side legs or use two sidelines and cross them between the legs. Sidelines and hobbles can both have a quieting effect on a horse’s mind.
The first time you use the sideline on your horse or while training the horse to accept them use a wide open sandy area. Do not put it on in the trailer or other confined space until they accept the sideline easily and well.
-

Sidepull #CP38
$199.00Description: The noseband on the Sidepull #CP38 is made of 3/8 inch firm nylon rope specially designed to lay correctly from the first ride. The headstall is made of single ply, 3/4 inch, dense, tight-fibered harness leather and has a 5/8 inch throat latch. The leather has been edged, hand-rubbed, oiled with Neatsfoot Oil and hand-rubbed again. The buckles and rings are all stainless steel.
Reins: If you’d like to purchase reins for your Sidepull some of our most popular choices are the #ASR6 DM Harness Leather Split Reins, or the #BLL1 Latigo on Latigo 5/8″ medium weight reins. At 6 1/2 to 7 feet either of these reins will work well on the smaller colt or horse. At 7 to 7 1/2 feet, the #ASR3 XX Harness Leather Split Reins are a good choice for the bigger colt or horse (generally 15 to 16 hands). Many of our other reins can also be used on this Sidepull. Visit the rein category to purchase your choice of reins separately.
How it works: Sidepulls are a good piece of equipment to use for starting colts, or to transition colts to from a soft rope hackamore. Using a sidepull is a nice way to teach young horses to move through turns with their noses first without putting any pressure on their delicate mouths. Once the colt is turning well with direct pressure from the sidepull a trainer will move to the snaffle, hackamore or bosal.
Sidepull is shown with the #BLL1 Latigo on Latigo 5/8 inch Medium Wt 7 ft Reins.
-

Easy Stop #ES1
$229.00Description: The Easy Stop #ES1 is a very good piece of tack to use when you want to teach your horse to stop correctly when cued, without having to put pressure on the mouth. Often a horse will show a lot of improvement in it’s stop with just a few rides in the Easy Stop.
The noseband is made of 3/8 inch nylon rope that is specially designed to lay right from the first ride. The headstall is made of 3/4 inch dense, tight-fibered harness leather. The leather has been edged, hand-rubbed, oiled with Neatsfoot Oil and hand-rubbed again. The buckles are stainless steel and the leather beneath the buckles is hand stitched together to prevent the buckles from sliding down as you’re adjusting the headstall. This Easy Stop includes a hand-tied tan 1/4 inch nylon fiador tied to the top of the spoon so it won’t interfere with the reins.
Choice of Reins: Almost any of the reins we make will work well. If you don’t see what you need here, please see the rein category These reins can be purchased separately.
How it works: The Easy Stop noseband will apply pressure on the nose just like a hackamore or bosal. Additionally, the stainless steel Easy Stop spoon will come forward as the reins are pulled and make contact with the horse’s chin, in the space between the 2 jawbones (the intermandibular space). I carefully designed the angle of the Easy Stop spoon to function correctly and lay close enough to the horse’s intermandibular space that it doesn’t apply pressure until the reins are pulled. The edges of the spoon are smooth and have a gentle bevel so there’s nothing sharp touching your horse. This Easy Stop is designed so the spoon doesn’t flip over when there’s not any pressure on the reins.
This is used by top professional cutting, cow horse, reining and barrel horse trainers, among others, and will last through years of use. This is a real good tool to have in your tack room for those times when a horse is not responding as soon as he is being asked to stop. Your horse should be broke to give at the poll and should be flexible both laterally and longitudinally before being ridden with an easy stop.
Shown on the horse with the Easy Stop are a pair of XX Harness Leather Split Reins #ASR3.
If you are unfamiliar with the use of an Easy Stop, seek professional help before using it on your horse.
-

No Buckle Hobble with Chain Center #H3C
$102.00Description: This No Buckle Hobble with Chain Center #H3C has an easy “on/off latch” that makes it a snap to take on and off your horse’s fetlocks. It is 1 3/4 inches wide and made of doubled and stitched latigo leather. The smooth stainless steel chain link in the center makes it more flexible than similar hobbles with leather centers such as the #H3L No Buckle Hobble. This should only be used on horses that are completely hobble broke.
Visit “Hobble Along” to read my Tack Talk article on proper and safe use hobbles.
For use only on horses that are hobble broke.